30 July, 2019

TTCRD 30 July DT Project

Hi Lovelies!

Today is challenge day for Design Team B for the Through The Craft Room Door Challenge.  This is a WEEKLY "anything goes" (any type of project and any theme) challenge with 2 design teams who alternate weeks to make projects showcasing the sponsor who often offers PRIZES!

This week's sponsor is Anne's Digital Arts.
Prize: Three digital Images

This week I was wondering aloud (OK that's nothing new) which image to use (out of the three we were given to choose from) and SmallCraftyDude was listening.  I have bird phobia so that's one eliminated and so I just decided to go with the basket of violets, bracing myself for a LOT of figuring out shadows to make the colouring realistic.

SCD asked me what the third choice was and when I told him it was a fence, he found it rather funny (kids, hey?) and started coming up with all sorts of puns.  I did what any no-nonsense PinkCraftyMama does in situations like these.  I told him "#ChallengeAccepted" 💪


What he didn't know when I said this was that I knew exactly what I'd do and hoped it would work.

I'm sure I've talked about being a Janeite here before (it's an actual thing, I promise!) and some of you may recognize the excepts of text from Pride and Prejudice!  The 1995 BBC adaptation dramatises this scene perfectly with just a touch of dramatic license.


I typed out the most relevant lines of text above the image and printed on the back of some watercolour paper.  Watercolour was going to look authentic (unlike the direction of my light and shade upon reviewing it 😁🤦) and I went with Derwent Inktense pencils for a couple of reasons.  Firstly, pencils are great for getting in small areas and secondly, they're actually ink so wont react again with water if they get wet after they've already dried.

I needed to use a fairly strong adhesive to keep watercoloured paper flat (even after it was dry and weighted down a bit) since from experience it seems to pull away from the card base and my personal preference for that are Permanent Glue Dots.  The ones in the blue dispenser make it fast and easy.

I kept it simple (I KNOW!!) and added just a hint of gold ink splatter.  Lizzy isn't ostentatious but she has taste so just a little seemed OK. 


Love and all things Jane,

16 July, 2019

TTCRD 16 July DT Project

Hi Lovelies!

Today is challenge day for Design Team B for the Through The Craft Room Door Challenge.  This is a WEEKLY "anything goes" (any type of project and any theme) challenge with 2 design teams who alternate weeks to make projects showcasing the sponsor who often offers PRIZES!

This week's sponsor is We are 3. You can more link to them below.
Prize:


https://www.etsy.com/shop/WeAre3
https://www.facebook.com/WeAre3DigitalShop/
https://www.facebook.com/groups/MorePaperFun/

Yes I know it’s another cat image!  Soz!  It just spoke to me as they often do. For some reason the first thing that entered my head was a visual of a fat cat jumping out of a cake.  I know that’s not exactly what’s happening here, but I kinda went with that vibe.

I thought it would also make a great opportunity to put Sara Scraps A Touch of Whimsy class to use for a card rather than a layout.  Go see this post here about the scrapbook version of Lesson 1 and this project makes up the card version of the same.  And yes this post counts as another opportunity to enter the giveaway to win a spot in the class! (Giveaway deets at the bottom)

I know it’s not nearly as whimsical as the layout or any of Sara’s projects, but a cat cupcake is still a rather whimsical concept when you think about it!


I definitely wanted variegated floss for the stitching which I didn’t have.  I have thread which just wouldn’t work but no floss.  As I was considering my dilemma, I spotted a variegated Lawn Fawn  twine which once I separated it, worked pretty well.  It was a lot stiffer than embroidery floss, but the look and colours were more or less what I was after.

I coloured the cat to co-ordinate and also to go with the cat stickers I was going to “hang” off the stitched “streamers”.


As far as sentiments went, things were a bit more of a challenge.  I’ve always found the phrase “treat yo’ self” that seems to be all over scrapbooking collections at least a bit cringy but this cat was just the ideal opportunity especially if I turned it into a gift card holder! 👍

So when I don’t want or need it, it’s everywhere, but when I do want it, do you think I could even find one? 🤦 In the end I did find a die cut and used it even though it wasn’t printed correctly.

Naturally it was only after I adhered the cat down with foam that I thought it needed to go under his paws as if he was holding it, so I replaced the blade in my craft knife with a fresh one, help my breath and started painstakingly dissecting those tiny toe beans.
 
Of course I needed to add some sparkle so on went some Wink of Stella on selected areas!

It's not 100% what I imagined, but I may revisit it.  Next up will be the layout version of Lesson 2 of Sara's Class!

Treat Yo' Self Gift Card holder


Giveaway Details - CLOSED!

🎨I'm going to give away a spot in Sara's class!!  😍
(If you're a cardmaker, I'm going to show you how this class can still be adapted to card making and I promise you'll learn some awesome new techniques!)


🎨 The giveaway will remain open until 11:59PM AEST (Australian Eastern Standard Time) on Wednesday 31 July (extended)
If you aren't sure what that is in your timezone, here's a TIMEZONE CALCULATOR
🎨 The winner will be drawn on Friday 2 August so PLEASE CHECK BACK HERE!
🎨If the winner and I can't make contact by Friday 16 August, I will have to draw a new winner
🎨Please try to email me at alex@pinkcraftymama.com This really is the easiest way for me to get in touch with you since not all blogger profiles have an email attached and if you JUST leave comments, I have no other place to search for you.

Until the end of July, I'm going to be making stuff (on and off) inspired by this class.  (You'll know the post relates to it because I'll have "GIVEAWAY" in the title and basically shout it from the rooftops!😜)

You will receive ONE entry for each of the following.  You absolutely don't have to do everything - just however many you like, but you need to leave a comment somewhere so we know you want to play along!

So...what do you have to do to get entries?
Follow Alex's blog (in the left sidebar)
Follow Alex on Facebook
Follow Alex on Instagram
Follow Sara on Instagram 
Subscribe to Alex's YouTube
Subscribe to Sara's YouTube 

If you already follow our socials then that bit is done for you!

Comment (once per day per person) on a post related to this giveaway (look out for the pink whimsy graphic) between now and the close of the giveaway :
Alex's Blog post
Alex's Facebook share
Alex's Instagram Post
Alex's YouTube Video

For another chance to enter here is the link to Project 1

So today...if you want to leave a comment, What do you think of when you hear the word "whimsy"? (or anything else if this doesn't grab you) and please don't hesitate to  email me with any questions at alex@pinkcraftymama.com


Love and creative cardmaking,

12 July, 2019

Design Team Post for Embellish With Flair (7 July)

Hello Lovelies!


I'm here with the next installment of my Lost Mojo (or Finding Inspiration) series that I've been writing for the Embellish With Flair blog!  If you missed the first installments, you can find them here:
Part 1
Part 2
Part 3
Part 4 (giveaway here ⬅)

As we continue our journey through the last few examples of getting inspiration from other artists' work,  we have just two more ways to look at.  Well, there are probably a lot more than that, but we have to stop at some point, right? 😂

Today we’re looking at a SKETCH.  A sketch is a (very) much simplified page design with symbols as a guide rather than a completed scrapbook layout to scraplift.  Sort of like the blueprints of a house rather than photographs of a fully furnished and decorated home!

Sketches come in varying levels of detail and there is something for every crafter.  You just need to figure out the level of detail you're after.

Search the same places for “scrapbook sketch” as we looked at in Part 2 of this series and see what comes up.  You can be more specific by adding number of photos etc into the search bar.

Today I’m going a little bit outside of my comfort zone and using a slightly different kind of sketch (for me), but it still has places to put lots of details and layers if so desired.

With this sketch, (like any sketch) you can follow faithfully or change it around. 

The sketch I’m using comes from Cocoa Vanilla Studios and it was used as a challenge for (inter)National Scrapbook Day.  Since I didn’t get around to using it by the challenge deadline I’ll use it today.


Their Face Book page has an album with all the sketch entries on to and I love seeing everyone’s different takes on the sketch.

I’m not sure how it came about, but I decided I was going to do a gaming layout, and I have a seemingly bottomless pile of those photos to scrapbook!  🙈  It was simply what was talking to me at the time! 🤷

I also started looking through paper that might work with the story and ended up in my Cocoa Vanilla section.  Subconscious decision being their sketch perhaps?  🤷  They do incredible boy collections and "Boys Rule" is probably my favourite very closely followed by "You Rock".  I mostly used these lines along with a few bits of the "Imagine That" boy line by Echo Park, a few Bella Blvd papers with gaming motifs and a few other random bits.


What does immediately strike me with the sketch is that there isn’t a designated spot for journaling and since this is critical for me, I need to figure this out before getting carried away with embellishing.


At this point you can decide how literally to take the sketch - to use exactly as many layers as the sketch or more or less?  To use the same number of embellishments (and maybe even the exact same motifs) or more or less?  I went with my typical multiple layers, multiple embellies and instead of girly motifs like butterflies and flowers, you can see how I was able to make this sketch work as a very boyish layout.
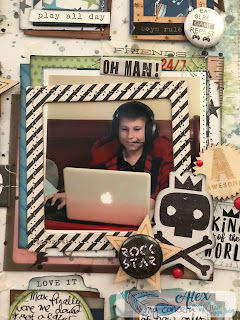
I’m going to be a little predictable and keep the photo on the designated photo spot (it looks best here since he is facing a little towards the left), so I can have fun with as many little embellishment boxes as possible!  You could also substitute some of the smaller squares for extra photos if you wanted to.

You could change the position of the boxes, mirror image the sketch, turn it upside down or change it to suit a different size page (eg 9x12 or 8.5 x 11).

The photo is this single, oddball, not-very-great-photo, but I never shy away from using these sorts of photos if they tell a story.  Using a sketch like this one I think slightly distracts from the imperfections of the photo, but I need to take care not to get it lost completely!


I printed the photo in both black and white and in colour.  Initially I preferred the b/w, but i definitely wanted to include red (which was in "You Rock", but not "Boys Rule" and a darker woodgrain since his bed takes up a fair amount of the image and it's a lovely warm brown timber sleigh bed.  "Boys Rule" had a great woodgrain paper which I used as a frame.  In the end I went with the coloured version.

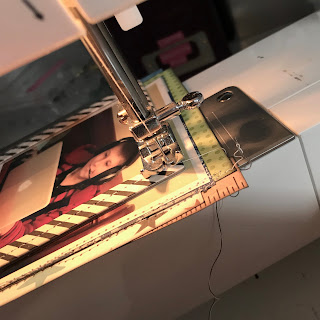
I constructed all the little squares and the larger photo square separately before sticking them to the page (with the exception of a few finishing touches).  They're a great size for housing flair!  Metal flair badges have a great boyish vibe and give me the dimension and texture I crave on a layout.  More texture was added with machine stitching (yes, you can totally stitch right through the thickest chipboard frames and acetate and layers of paper...together even!).  You can also staple right through wood veneer elements! 👍


I do struggle to use the various sized frames that come in embellishment packs or on their own.  I was determined to use as many as I could on this layout since the sketch really lent itself to them.  I pulled out frames in all kinds of finishes from acetate to chipboard to vellum.  I also seem to struggle with acetate embellishments especially those photo overlays by Crate Paper from at least five years ago.  I was determined to work some of those into my layers!

After trimming and adhering the white paper with the faux messy paint around the edge,  I decided I wanted to add some paste through a star stencil.  This necessitated masking off the woodgrain border (since the paste ended up being a bit of an afterthought).  I mixed white and pearlescent embossing pastes together as the pearl ones sometimes dry kinda silvery, but oddly my "franken-paste" dried kinda yellowish!  🤷 I also went to town with ink droplets in co-coordinating colours.  Most would end up covered and toned down.


I opted for embossing paste over modelling paste or texture paste since its the softest and knowing I was going to sew through it, it needed to have a bit of "give".  There was also the added benefit of popping up all my elements a little off the paper. 👍


The down side is that if you're going to adhere anything to mixed media paste, you need a REALLY strong adhesive.  There are a few options, but my personal favourite is Glue Dots.  There are all sorts of Glue Dots for all kinds of purposes.  Permanent squares or dots (in the blue dispenser) are ideal to stick the finished squares to the background and also for adding embellishments on top of them like the flair, chipboard and wood veneer stars etc

Once I had the bones of my layout figured out, I put the sketch aside since there wasn't anything else I needed from it.  You may wish to do this sooner in your process if it distracts or confuses you, or keep it in front of you right to the end.  There isn't a correct approach!

Three of the badges came from the "Gamer" set and I searched high and low for "Words 4" in my stash only to discover I don't have it yet (I think it's on its' way to me as we speak!) so I used one from "I Wanna Rock" to have 2 white and 2 black.


After sticking the layered embellishment clusters and photo cluster to the background,  I came in with the bulky embellishments and then smaller stickers, words stickers and finally a few enamel dots.  The embellishment clusters were so much fun to put together, but they did take a little while to do.


Overall, I'd say I stuck to the sketch reasonably faithfully while still keeping the elements in my pages that make them mine.  I tend to stick to sketches fairly closely when I do use them.  To me it's the whole point of using them, but as I outlined above, there are plenty of other approaches.  Sometimes the way my photo is composed means I mirror image the sketch or rotate it in some other direction to suit the composition better.  

Here's the finished layout!

One Sided Conversation


Do let me know if you have any questions in the comments or want to talk about how you like using sketches!

Embellish With Flair products used:


Love, and Embellish with Flair,


07 July, 2019

Giveaway update (now closed!!)

Hi lovelies!


Time has been flying and not only have I not managed to make any of my ideas based on Sara Scraps' class like I promised, but the date of the GIVEAWAY passed a few days ago and it would be so sad not to see more of how great Sara's class is.

So I've updated the original post (click on the links to see the deets) and will extend the giveaway til the end of the month.  I'll keep popping back with projects and reminders and more chances to enter with each post.

Thanks so much for your patience!  It'll be worth it, I promise!!

Love and crafty giveaways,

02 July, 2019

TTCRD 2 July DT Project

 Hi Lovelies!

Today is challenge day for Design Team B for the Through The Craft Room Door Challenge.  This is a WEEKLY "anything goes" (any type of project and any theme) challenge with 2 design teams who alternate weeks to make projects showcasing the sponsor who often offers PRIZES!

This week's sponsor is Small & Round by Jeremiah Ketner. You can read a bit about him below.
Prize: 5 images (winners choice) and 30% off coupon for any coloring pages on his Etsy store:
"Jeremiah Ketner paints a world to which fairytales belong. His paintings often depict richly colored environments inhabited by a cast of pensive, dreamy young women and whimsical sprites. Each character presents a unique brand of beauty. Renowned throughout the US and internationally, Ketner attributes his influence to Art Nouveau, Japanese Aesthetics and Anime. He resides and creates from his studio in Tokyo, Japan."

Today's project is one of those that appear to be easier on first glance than on execution.  I chose this image - I like the pose of the girl and the cat hair pretties along with her pensive expression.

I'm not much of a hybrid girl so printing her on colouring paper with the background all filled in with a digi print wasn't going to be my thing and to be honest I hadn't given t a lot of thought until I had already started.

I could either cut out the girl as a rectangle or other shape or...fussy cut.  Have you tried fussy cutting a single printed line like the ones coming from her hair ornaments?  Clearly I chose the most sensible option! 🤣🤣🤣

But I digress.  After I had coloured her skin (and before that whole fussy cutting insanity) I started to think about the background.  I have some gorgeous Basic Grey gems with Japanese style patterns but I just couldn't bring myself to cut into them! 

Instead I cut a screen type pattern with a slightly oriental vibe on the Silhouette which I hadn't used in a while.  Behind that I tried blending Distress Oxide Inks.  Yeah I know way bright! 😳😳😳

My relatively newfound appreciation for Removable Glue Dots make them my go-to for keeping things in place to make blending the Distress Oxide Inks reasonably stress free!

I did actually hope the kimono would turn out to be a much stronger pink than the burgundy it ended up.  I took inspiration from the sakura and plum blossoms in her hair.  March/April having been the Sakura Festival in Japan was a big inspiration for the colours even if they didn't exactly turn out the way I expected!

I really REAALLLY need to work on colouring black hair (please don't look too close!).  It's much harder than browns or blondes or red shades.  Her skin also was a bit more tanned than I would have liked, but my lightest shades of markers are begging for a refill.

The original image had circles and a star in her hair in the same places as I put the gems.  I decided I wasn't going to colour around them and by using teeny tiny gems (which I pulled from my cache of nail art supplies), they would give the project some texture.  The largest ones were OK with a Micro Glue Dot (so you can imagine how tiny the rest were).  I ended up cutting slivers off glue dots and kinds balling them up to adhere them.  I'm terrible with liquid glue at the best of times and in such a tiny space it was asking for trouble!

I used a black card base (it ended up being about 5.5" square) then cut file was stuck to the blended background and onto the card base.  I mounted the lovely image onto foam and adhered her to the card base before proceeded with the fiddly task of adhere the gems in her hair.

All that remained was to add the sentiment.  I was imagining a heat embossed strip of vellum across the bottom, but the ascenders and descenders in this Reverse Confetti sentiment made it just too wide.  I ended up cutting around the words leaving just enough to be able to tell that they were embossed on vellum in a sort of rose gold embossing powder by Altenew.

Well here is it in it's entirety:

Thinking of You Card


Don't forget to stop at the challenge page and enter a project for a chance to win a prize!

Love and carefree colouring,